Vytio IPTV System (STB/TV Management)
Introduction
The Client Console is for the administration, monitoring and control of IPTV Clients (Set Top boxes (STBs) and TVs).
For administration, The Client Console can be used to:
Add (i.e. register) or remove (i.e. deregister) STB/TVs to/from the IPTV system.
Change registered STB/TV’s attributes, such as their Locales (room numbers).
For monitoring: The Client Console shows STB/TV's operations based on their activity reports.
For control: The Client Console can be used to send selective commands to one or more STB/TVs.
Login
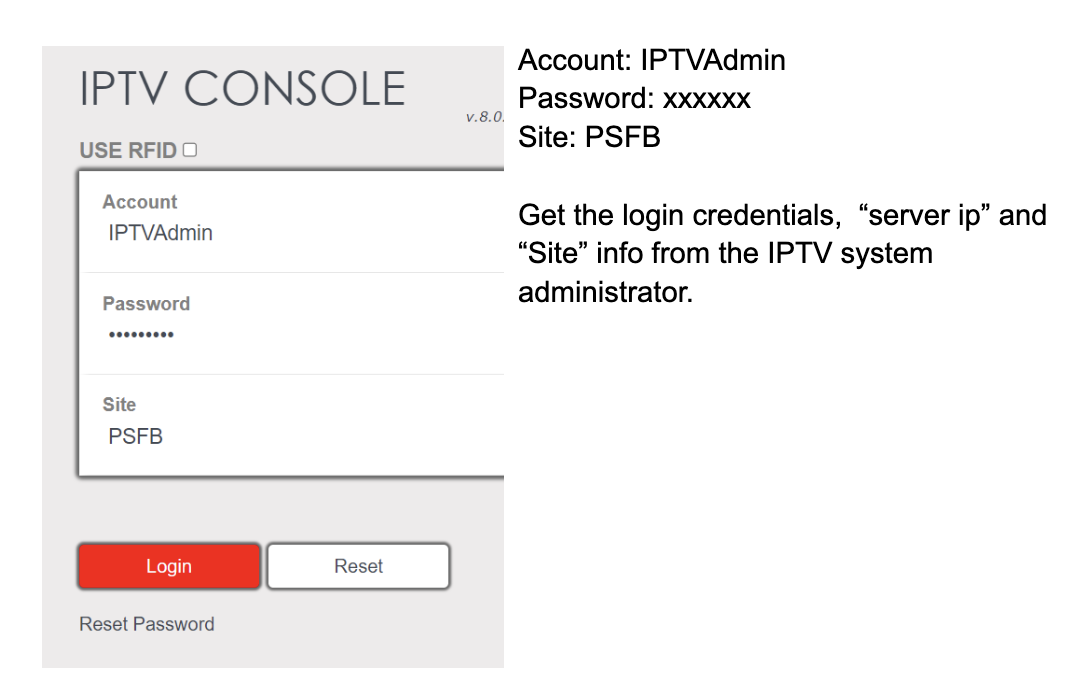
Bring up Chrome browser. Launch the IPTV Console (Enter http://<serverip>/console).
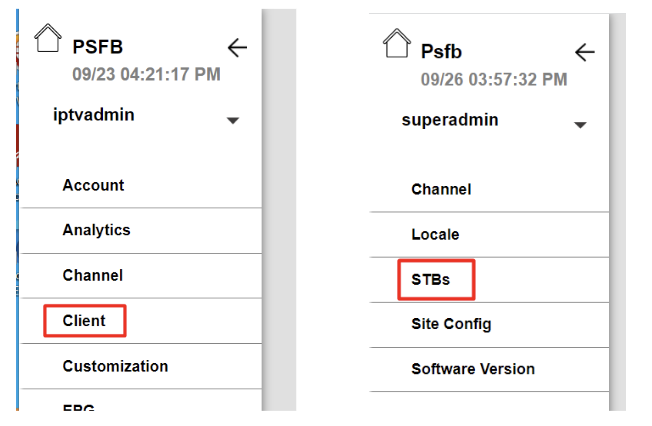
2. Select Client or STBs Console.
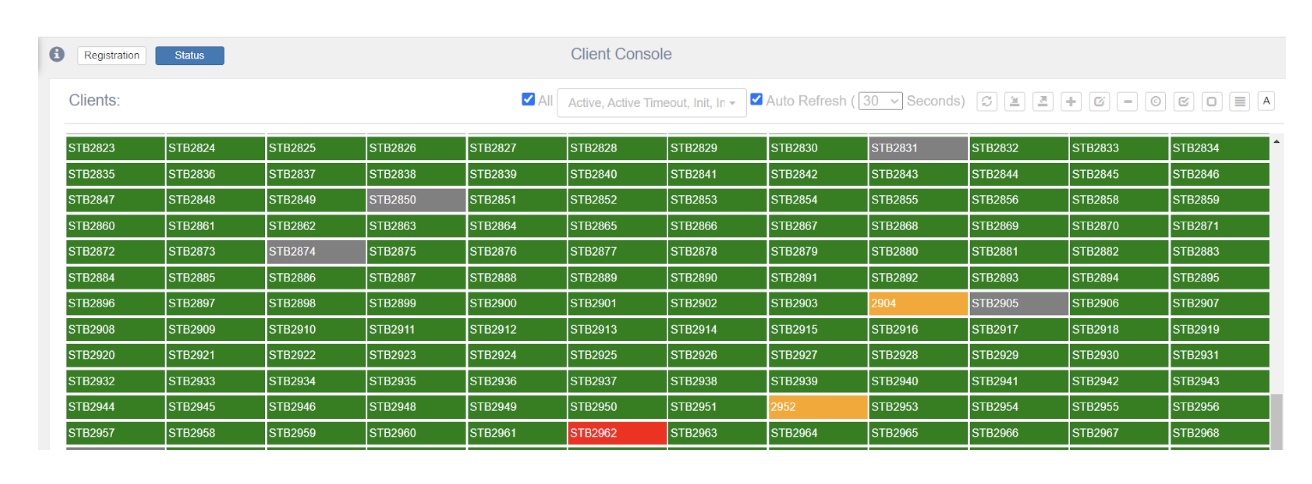
3. The Client console “grid” status page will be shown.
Console action Buttons & STB/TV status descriptions
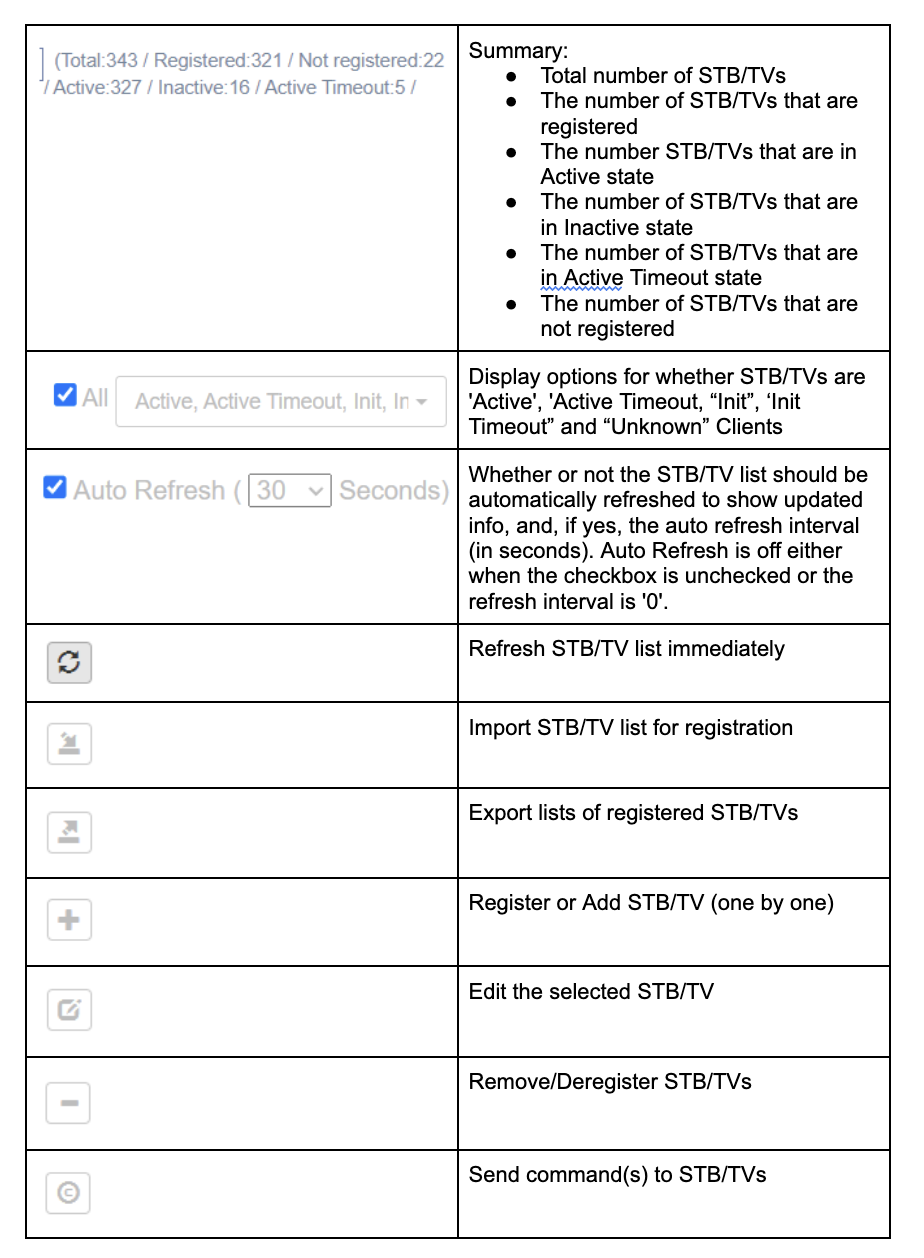
Console action buttons
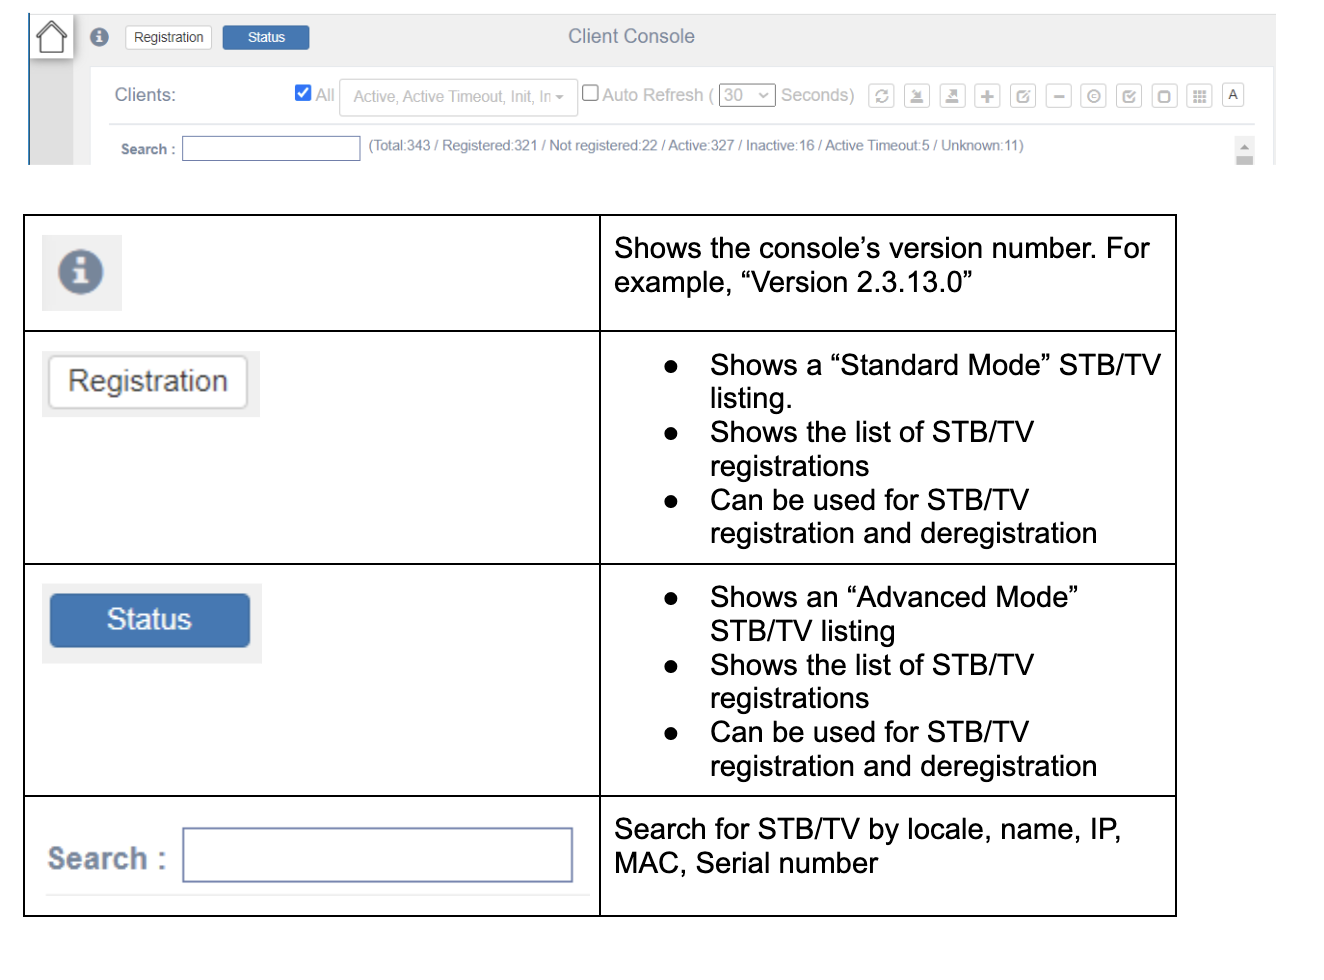

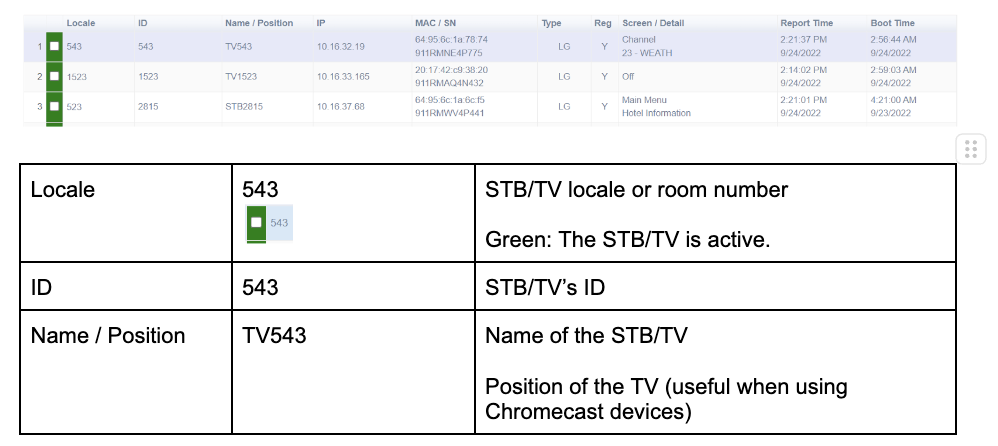
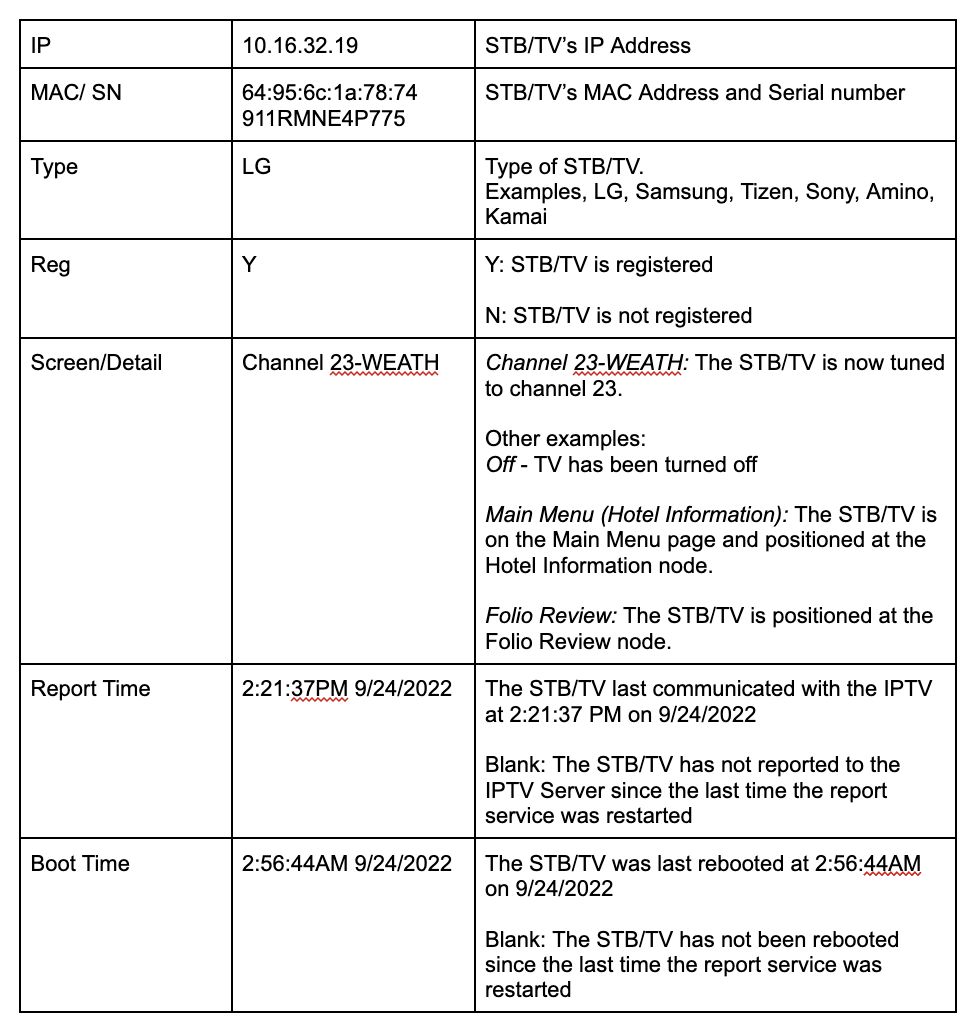
STB/TV Status Description

IPTV Console presentations Modes

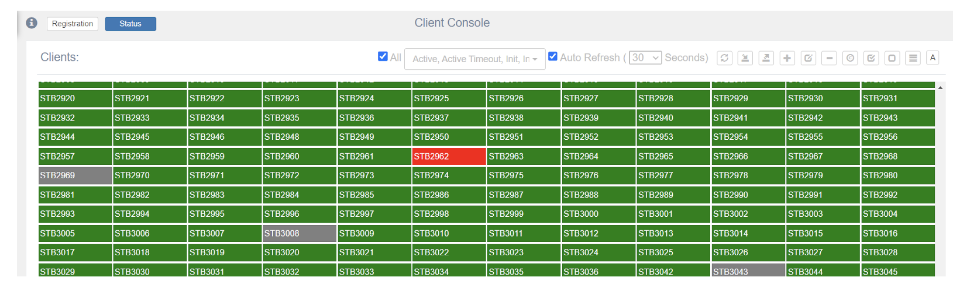
STB/TV grid presentation
The grid presentation gives an overview status look of all the STB/TVs.It shows the STB/TV’s names (not locales) and whether they are active, inactive, or unregistered.
For old deployments, the names may appear as “STB2009” and might not be the same as the locales (room numbers).
In new deployments, the default names are the same as the locale names. For example “TV2300” is a name for a TV in room 2300.
The names can easily be changed in the “Registration” page or the “Status > Client list” page.
Grid presentation example
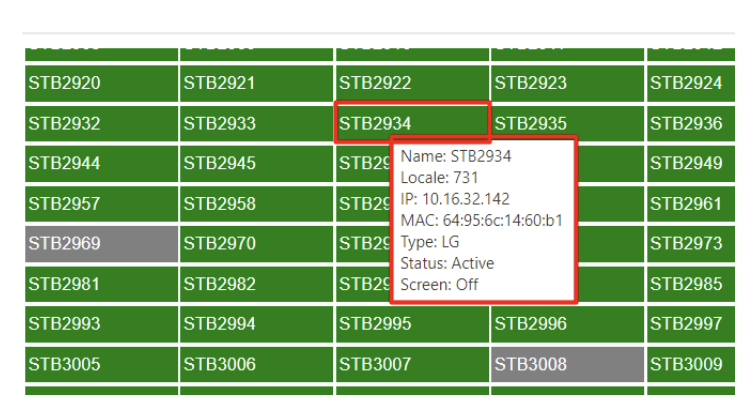
Place the cursor on any of the grid locations to see details about the STB/TV.
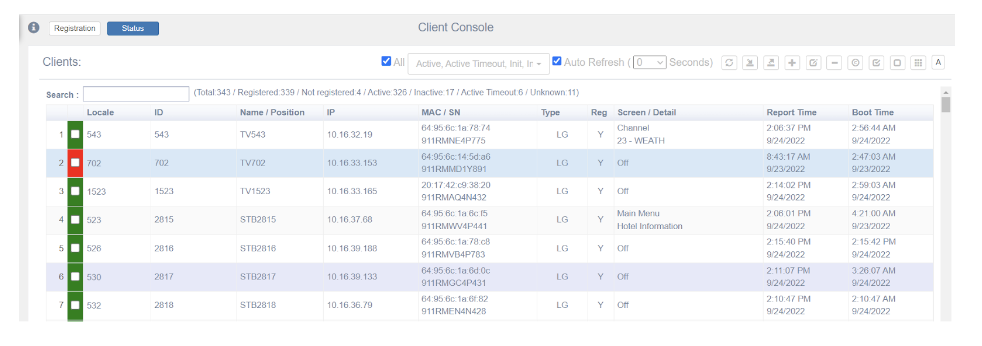
STB/TV list presentation

List presentation Example
STB/TV Status Summary
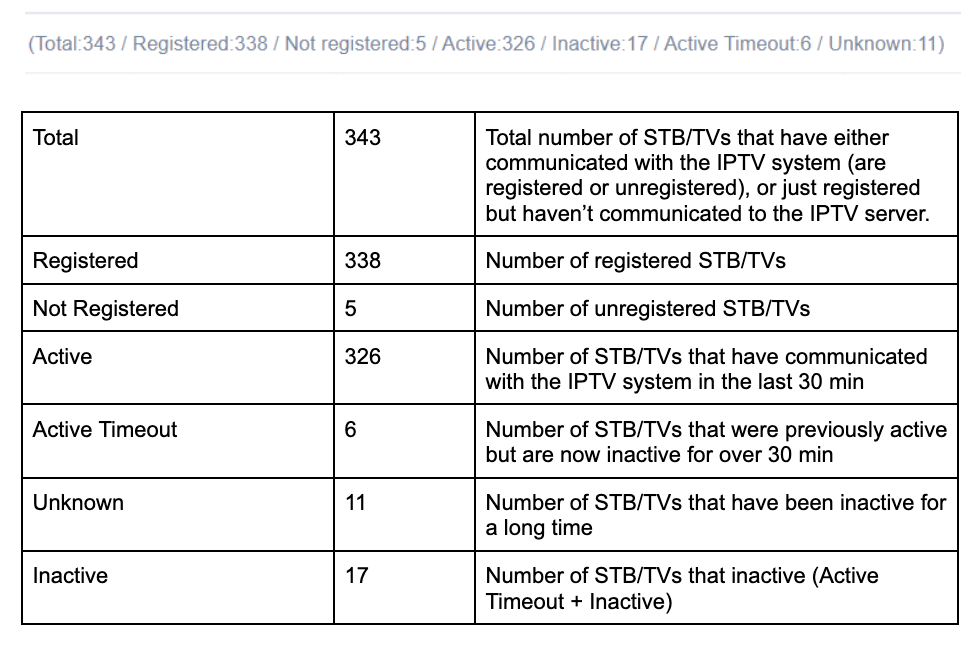
Active STB/TV Status description
InActive STB/TV Status Description


Unknown STB/TV Status Description

Managing STB/TVs from remote
The following are the different ways the STB/TVs can be managed from remote via the Client Console.
Reboot
Hardware level restart of the STB/TV
Reload
Force the STB/TV to reload only the IPTV software without doing a hardware reboot
Refresh
Same as reload except that, the STB/TV will reload only when it has been idle for at least 15 min. Idle here refers to no remote controller function for 15 min or more. Watching TV or a movie is not considered idle. In these cases, the STB/TV will reload between 3-5am.
Resynch
Force the STB to refresh its channel lineup and status
Power on/Off. Applicable to smartTVs but not STBs. The power is a toggle and therefore, if the TV is off, pressing Power on will turn it on and pressing Power on again will turn it off.
Start/Stop Logging (to be supported in future releases)
Sending remote STB/TV commands
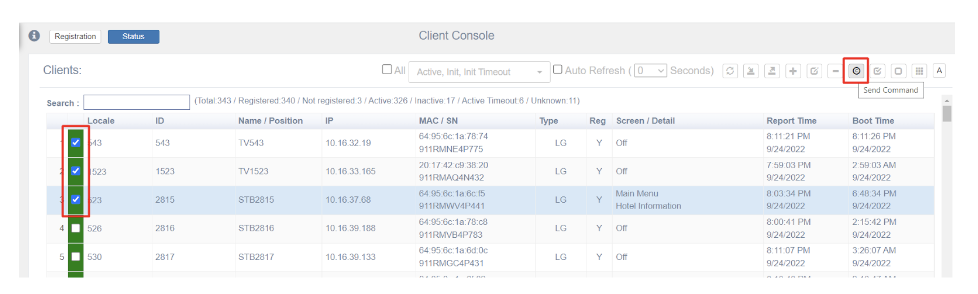
Checkmark to select the STB/TVs
Click on Send Command

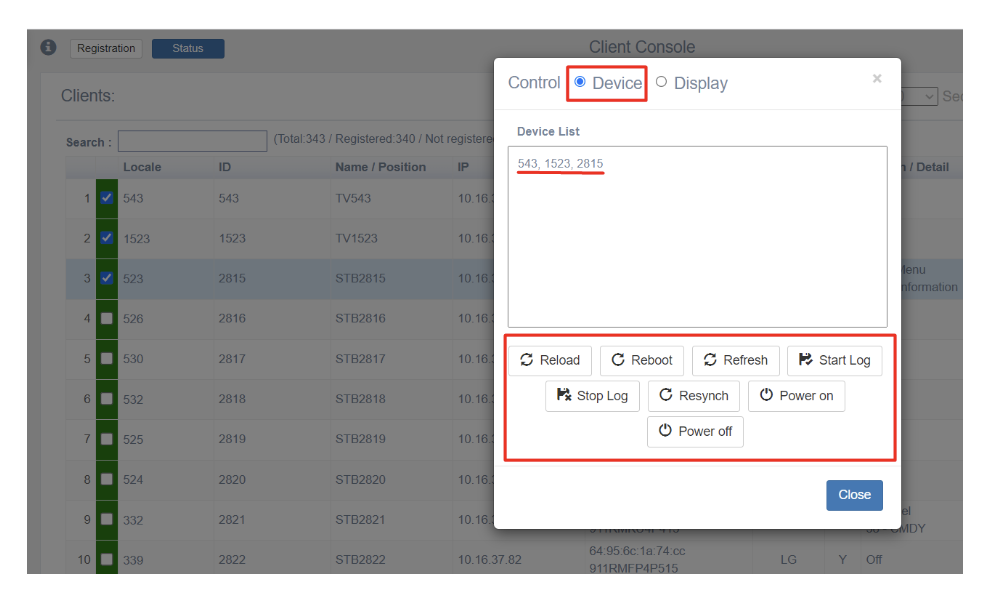
3. Select Device. Click on the remote command to be sent.
Managing Displays from remote
There are times when STBs are connected to non smartTVs or displays and there is a need to control such displays. Currently, the only managed “Displays” are “Planer” TVs. The following are the different controls:
Power on/off
Mute on/off
Volume up/down
Volume 25
Volume 50
Sending remote “Display” commands
Checkmark to select the STB connected to the displays
Click on Send Command
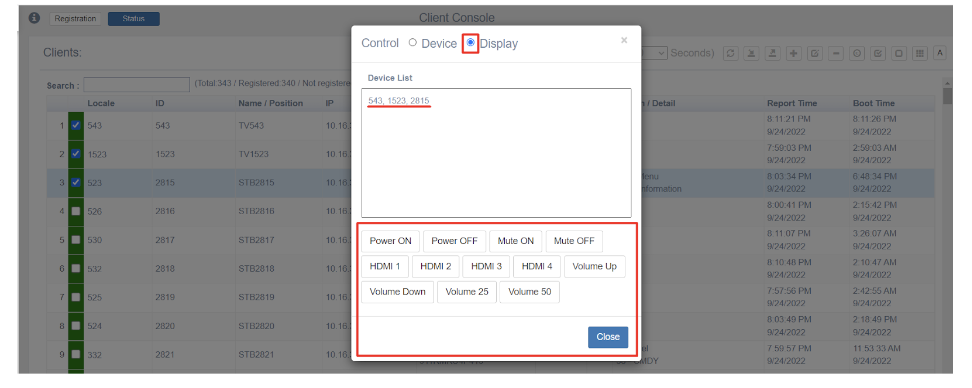
3. Select Display. Click on the remote command to be sent.
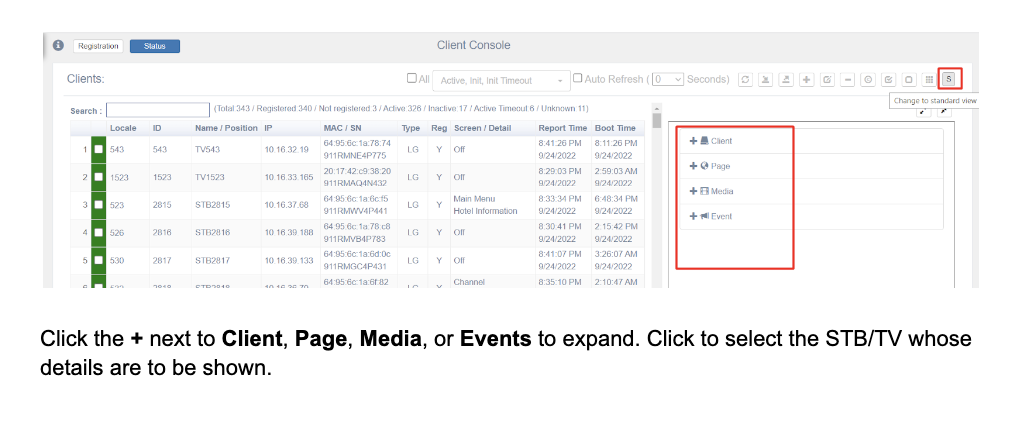
Showing an STB/TVs detailed view
Client details

lastActivityMessage and Config details

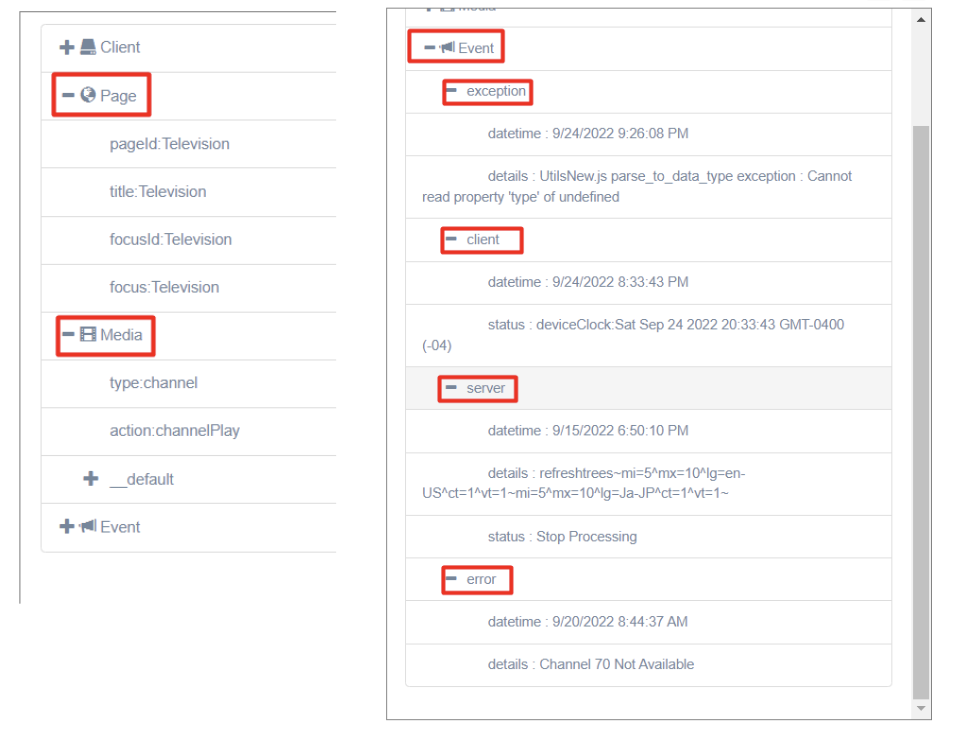
Page, Media, Event details
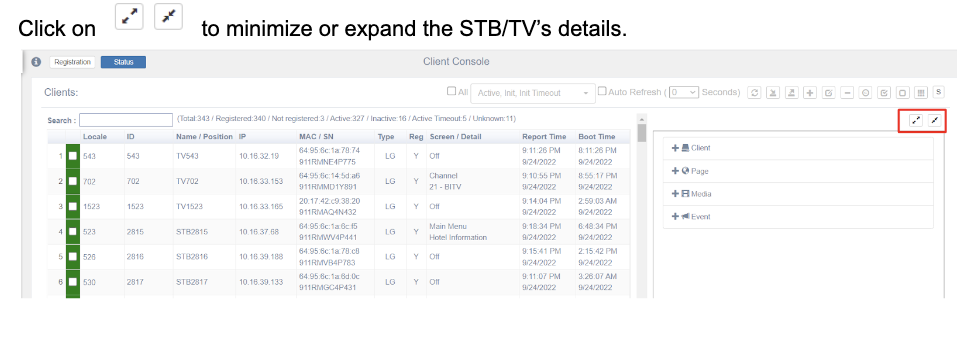
Minimizing and expanding the details page view
Registering STB/TVs
There are four ways of registering STB/TVs to the IPTV System.
In front of the TV
Registration tab
Status tab > Register or Add Client button
Status tab > Import button
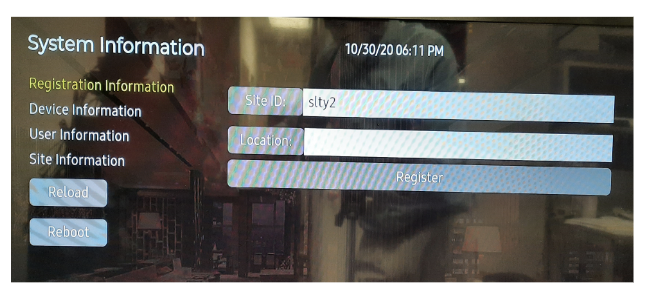
In front of the TV STB/TV registration
If an STB/TV is not registered or has been deregistered, it will boot up to the system information page. The Client Console will show it as below.

To register in front of the TV, use the remote control to navigate to the right then down to “Location”. Click “OK”. Type in or use the virtual keyboard to enter the locale (room number). Then select “Register” and click “OK”.

The STB/TV will reboot. The Client console status will change to be as follows

Registration Tab
Get the MAC address of the STB/TV
Select the Registration tab
Click on + (Register or Add Client)
Enter the name, MAC Address and Locale (room number). Enter the Type and IP address if available. The possible types are LG, Samsung (NC, ND, NE series), Tizen (NF, NJ, NT, AU800), Sony, Amino, Entone.
Click on OK.
If the “Type” and “IP Address” are correct, the STB/TV will be automatically rebooted and will appear in the Client console as fully registered.
If the “Type” and “IP Address” are left blank or incorrect, The STB/TV will have to be manually power cycled for the registration process to be completed.

Status tab > Register or Add Client button
Registering an STB/TV that has already been connected to the IPTV System.
Select the Status tab.
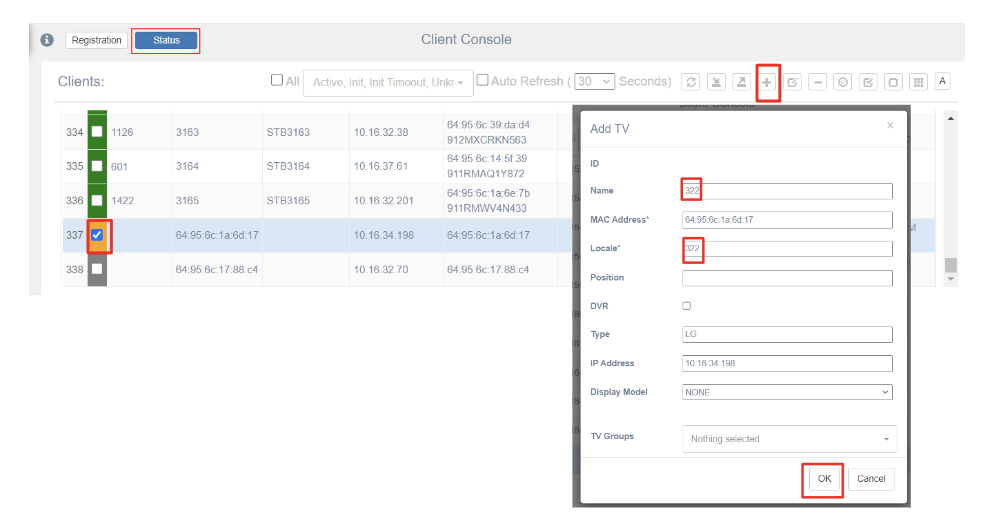
The STB/TV will be shown with an “Orange” status, with no locale, using its MAC as the ID.
Checkmark the STB/TV, click on + (Register or Add Client).
Enter its name and locale. Click on OK.
Registering an STB/TV that has not been connected to the IPTV System.
Get the MAC address of the STB/TV
Select the Status tab
Click on + (Register or Add Client)
Enter the name, MAC Address and Locale (room number). Enter the Type and IP address if available. The possible types are LG, Samsung (NC, ND, NE series), Tizen (NF, NJ, NT, AU800), Sony, Amino, Entone.
Click on OK.
If the “Type” and “IP Address” are correct, the STB/TV will be automatically rebooted and will appear in the Client console as fully registered.
If the “Type” and “IP Address” are left blank or incorrect, The STB/TV will have to be manually power cycled for the registration process to be completed.

Status tab > Import STB/TV list
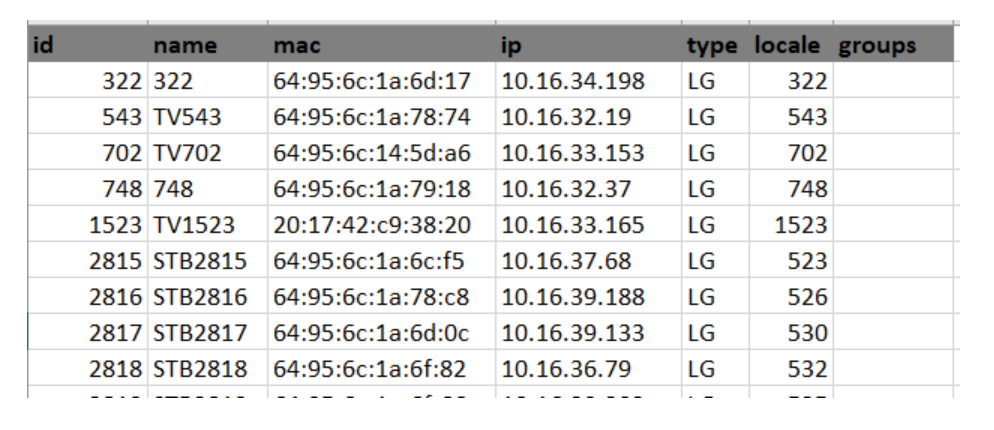
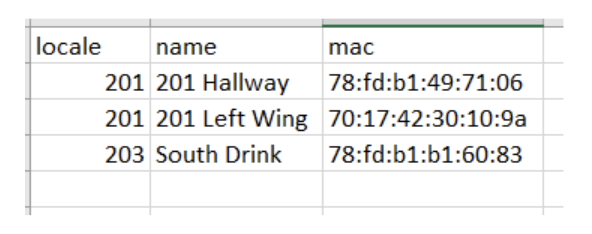
Create an excel file with the STB/TV information. Save the file using [CSV (comma delimited)(*.csv)]. Name the file as “Client.csv”.
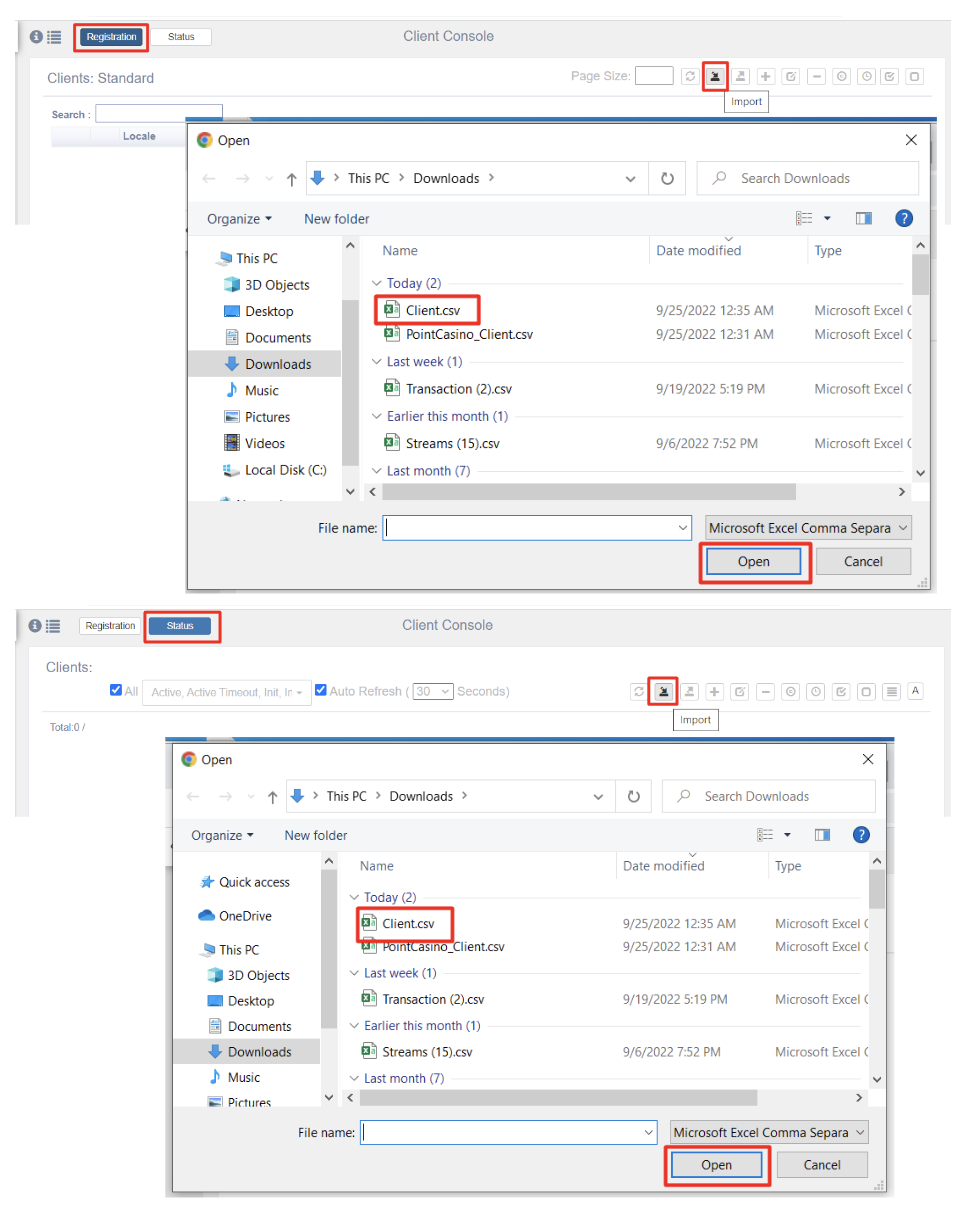
2. Select Registration tab or Status tab. Click on the Import action.
3. Browse for the client.csv file then click on Open.
4. A “Preview” listing of the STB/TVs to be imported will be shown.
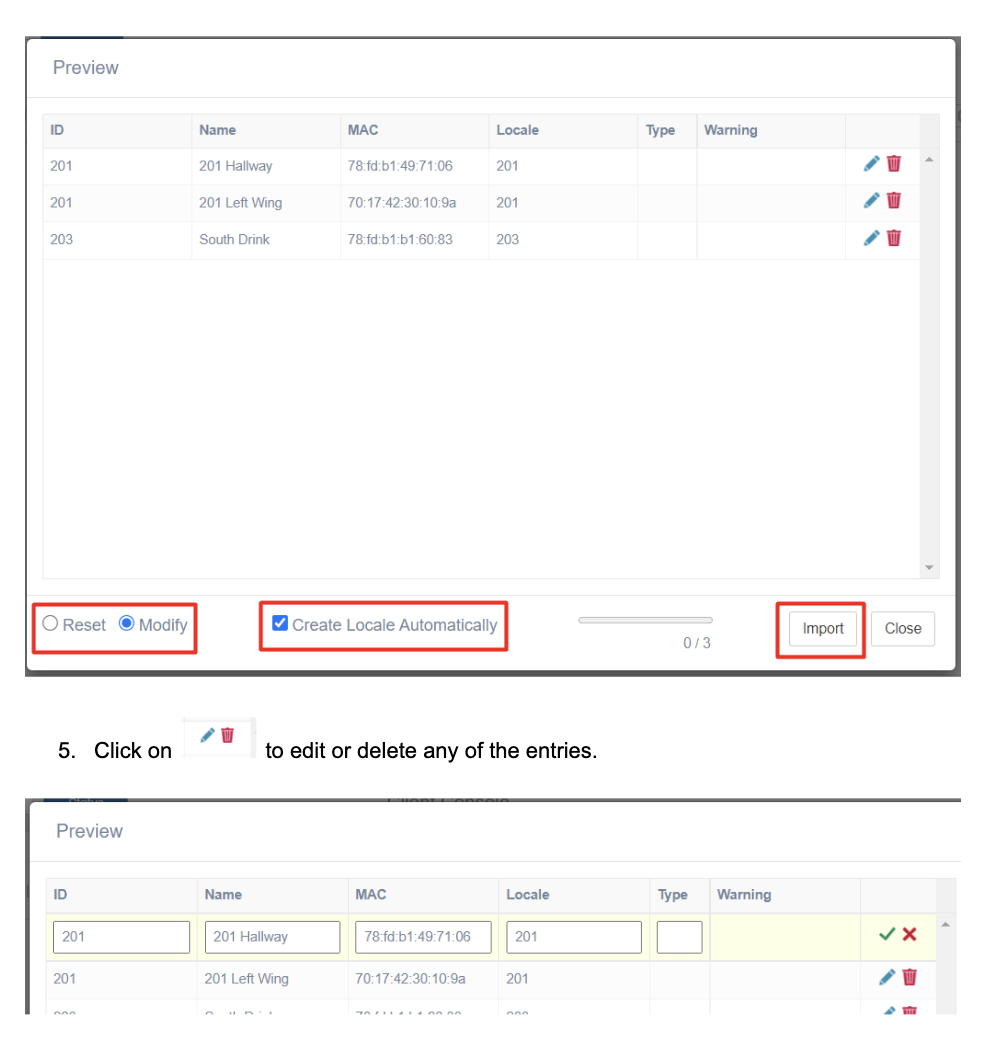
6. Select Modify, Create Locale Automatically then Import.
Using “Reset” will delete all of the current STB/TV registrations before importing the new list.
7. The newly imported STB/TVs will be shown as follows. The status will change to green when the STB/TVs are connected and rebooted.

Deleting or Deregistering of an STB/TV
If an STB/TVs locale (room number) assignment is incorrect, the correction can be done either while in front of the TV or from the client console.
Deregistration while in front of the TV
Using the remote controller, press the navigation keys as follows:
[up][down][up][down][right][left][right][left]
The system information page will be shown. Navigate to the right then down to Deregister. Press OK.
The STB/TV will reboot and go to the system information page again, ready for registration.
Deleting or Deregistering using the client console
The deletion or deregistration of the STB/TV can be done from either the “Registration” or “Status” table.

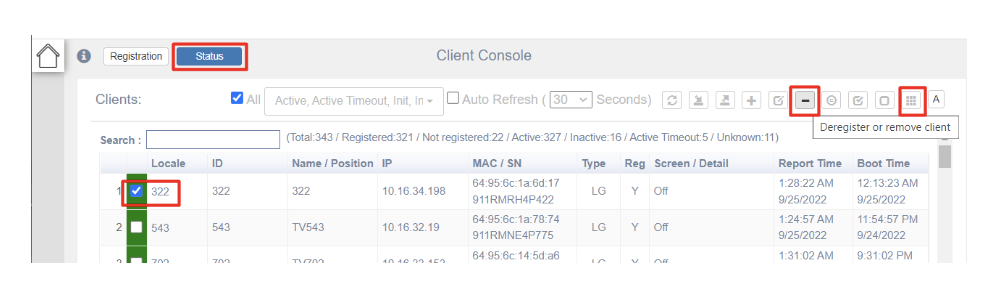
If the STB/TV is “Active”, it will auto-reboot and be shown as a “not registered” device.
Assigning TV Displays to STBs for remote management
There are times when STBs are connected to non smartTVs or displays and there is a need to control such TVs or displays. Currently, the only managed “Displays” are “Planer” Displays. The following are the supported “Planer” Displays.
Planer-ps
Planer-ep
Planer-ur/qe
Planer-sl
The Display to locale assignment can be done through the “Registration” or “Status” tabs.
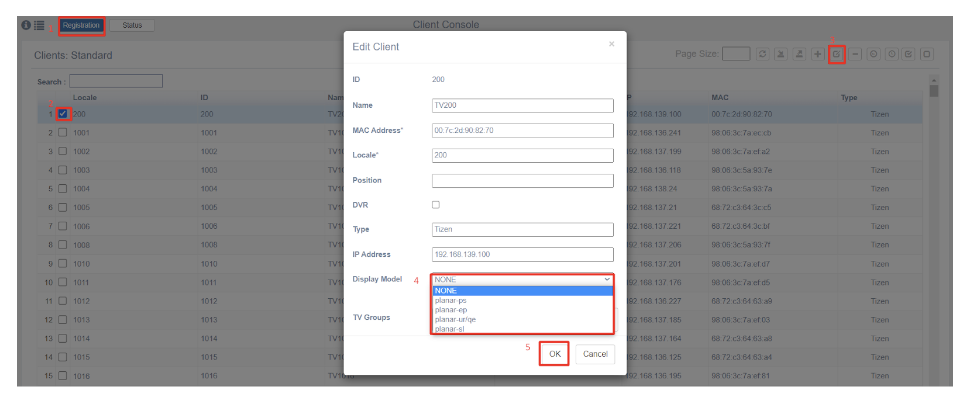
Display-to-locale assignment through Registration tab
Select Registration tab
Checkmark the locale to be edited
Select Edit Client action button
Under “Display Model”, select the display model type
Click OK to finish
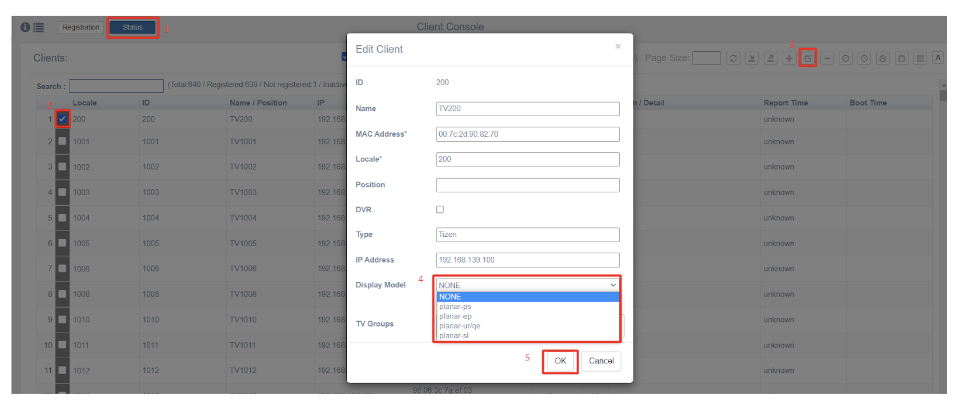
Display-to-locale assignment through Status tab
Select Status tab
Checkmark the locale to be edited
Select Edit Client action button
Under “Display Model”, select the display model type
Click OK to finish
Exporting STB/TV list
The export can be done from either the “Registration” or “Status” table.
Click on the Export action button. The STB/TV list will be placed in the “Download” folder and saved as “SiteID_Client.csv”.

Example of an exported STB/TV list.